Activities for Adults with Special Needs: Mini Egg Chocolate Nests
How to Make Mini Egg Chocolate Nests
Spring is a time of a many splendid thing. Life is everywhere, with fresh flowers starting to pop up out of the ground, that fresh spring air, and mother birds tending to their nests. It’s also a fabulous time for spring DIY crafts and activities.
Making chocolate nests is a great activity for adults with intellectual and developmental disabilities who may have a restricted range of movement, and who may love chocolate.
Chocolate bird nests are not only delicious but also very practical. Making an Easter cake and don’t know what to put on it? Chocolate nests. Craving chocolate want to make it a longer experience? Chocolate nests. It also has the added bonus of fiber from the edible twigs. Oh, and where else are you going to keep your Cadbury Mini Eggs? Yes, chocolate nests are an imperative part of the season. And, they’re super easy to make.
To Make Chocolate Nests, You Will Need:
- 3-5 Large (traditional-size) Shredded Wheats
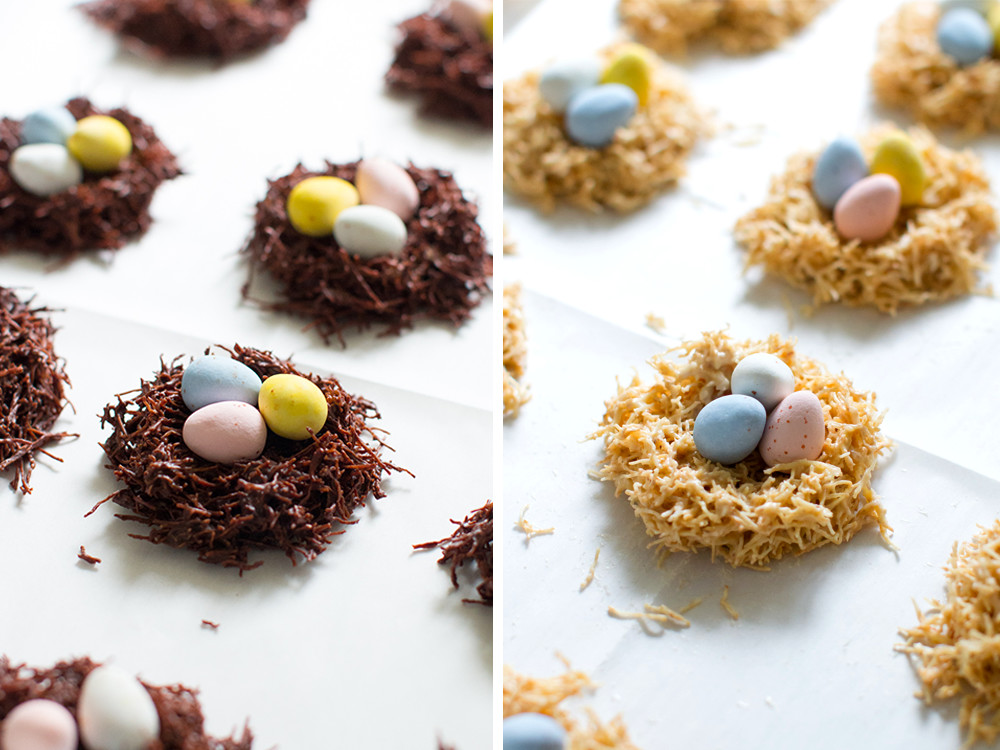
- 2 large Cadbury milk chocolate bars or white chocolate bars
- Cadbury Mini eggs of any variety. You can get the shimmery eggs, you can get the traditional milk chocolate eggs, or you could opt for white chocolate eggs—it’s your party!
- A large mixing bowl
- 1-2 large baking sheets
- A wooden mixing spoon
- Mini cupcake papers
- Oven gloves
- (optional) A pot for boiling water
- (optional) A large glass bowl to fit over the top of the pot with room to spare
Note: the Chocolate bars are there to be used as glue for the nest. If you use white chocolate it looks more like the color of a nest and if you use milk chocolate, that’s the more traditional recipe.

How to Make Chocolate Nests:
- To get started, lay out the cupcake papers on your baking sheet. It doesn’t matter how far they are apart or how close they are together. There won’t be any actual baking during this activity.
- Get your large mixing bowl and gently break your shredded wheat up into it, try not to break too many of the strands. The strands will make up the twigs in the nest. As you mix them with the chocolate, they are going to get broken up anyway, but at this point you really want to maintain as many of the longer ones as you possibly can. If they do break, that’s not a reason for concern.
- Once you’ve broken up three shredded wheat into your large mixing bowl, set it aside.
- Next up you’ll want to start to melt the chocolate. There are two ways to melt the chocolate and white chocolate tends to be easier than milk chocolate. You can either break up the chocolate into squares, place it in a microwavable dish and microwave it in short bursts of three seconds, or you can do the traditional melting technique over the stove top. The first is obviously faster but it can also lead to overcooking the chocolate which will just make it crumbly and not very useful for this activity.
Note: If using the microwave method, you can skip to step 12.
- The second way to melt chocolate is to fill a pan two-thirds full of water. Nestle a glass bowl in the middle of the water, making sure it’s slightly larger than the pot so that it won’t fall in!
Note: This more traditional way of melting chocolate is kind of fun to watch. It has a variety of textures so (along with eating it) becomes a full sensory experience! That translates to a genuine win win in the grand scheme of things.
- Ok, so, to use the boiling water method of melting the chocolate, you’ll have the glass boil nestled into the pot of water, making sure that the bottom of the bowl is submerged in about an inch of water.
- Start to heat the water on medium to medium-low.
- Break the chocolate (either milk or white) up into squares and place it in the bowl.
- Gently heat the water and watch as the chocolate begins to melt. You can stir the chocolate to help it along.
- Once the chocolate is completely melted, take it off of the heat. Set the bowl of chocolate aside onto any cold part of the cooktop.
- Wait for up to a minute so that the outside of the glass bowl isn’t boiling hot.
- With your oven glove on, spoon the chocolate into the large mixing bowl that has the shredded wheat in it.
- Mix gently until fully incorporated.
- Once the mixture is cool enough to comfortably handle, scoop a rounded teaspoon of the mixture into each one of the mini cupcake papers.
- Once some of the cupcake papers have mixture in them, push a thumb into the center of the mixture to make a little divet.
- Next, place 1-3 Cadbury ‘s Mini Eggs in each nest.
- Set the nests aside for 20 minutes or until fully cool. Make sure that they’re hard to the touch before picking them up.
- And done! You now you have a beautiful set of edible chocolate nests to celebrate the season of spring.
Check out our blog posts below for more activities for adults with intellectual and developmental disabilities.

About Stephen’s Place
Stephen’s Place is an independent apartment community for adults with developmental and intellectual disabilities, located in Vancouver, WA (7 minutes from Portland, OR).
If you have a loved one with developmental or intellectual disabilities who is looking for a community to live in, please contact us for more information.
Stephen’s Place is a private-pay apartment community due to our state-of-the-art amenities and programs. We are a nonprofit and do not profit from our community. We are private pay because we spend more than some housing communities to ensure that our residents are comfortable and can safely live their lives with independence and dignity.
